The effect of extra Perimeters in 3D printing.

After my discussion with Nophead in my previous post I realised that my attempt to compensate for hole shrinking was flawed. It seems that the dominant effect wasn’t what I thought but turned out instead to be the number and order of perimeters I was using in my Slic3r settings.

This has already been researched before, but I decided to investigate it further. This time I used RapCAD to generate the test pieces since its multi-material support made creating the Slic3r print modifiers a doddle.

module main(){
difference(){
cube([100,17,5],true);
for(i=[-2:2])
translate([i*20,0,0])
cube(6,true);
}
}
module mods(){
for(i=[-2:2])
material()
translate([i*20,0,0])cube([20,30,10],true);
}
main();
//mods();

I decided to use square holes since I can then measure them accurately with a digital vernier calliper.

Because of the way Slic3r handles multi materials, and modifiers I had to export the main() part first, then comment it out and export the mods() as a separate multi material part.

Screenshot from 2016-02-13 20:55:44

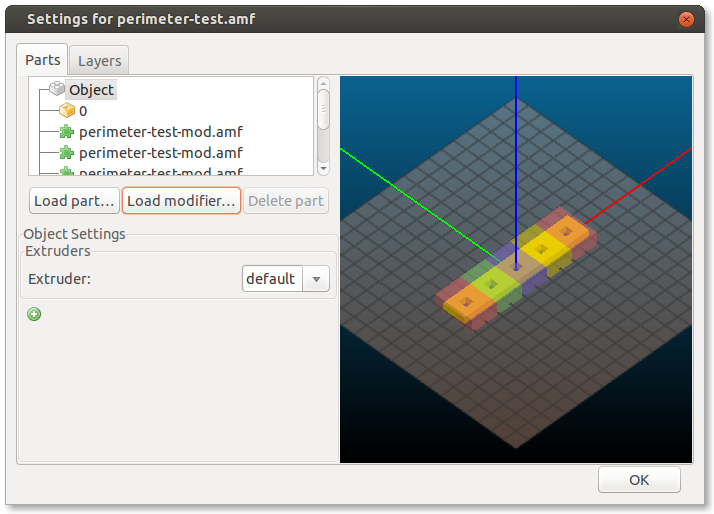
I applied the mods such that the first hole had 1 perimeter, the second 2 perimeters, etc. up to 5 perimeters. Unfortunately Slic3r decided to add extra perimeters internally to the part. This is probably a Slic3r bug but not a problem for this test piece.

perimeters-test

I printed the parts out and took 4 measurements of each hole, 2 widthways and 2 lengthways. I then took the average of these four measurements and subtracted them from the specified width of 6mm to get the error. I divided this value by two since this error is doubled up, (there are two sides to the hole).

The blue line in this graph shows the results:
Screenshot from 2016-02-14 13:10:46

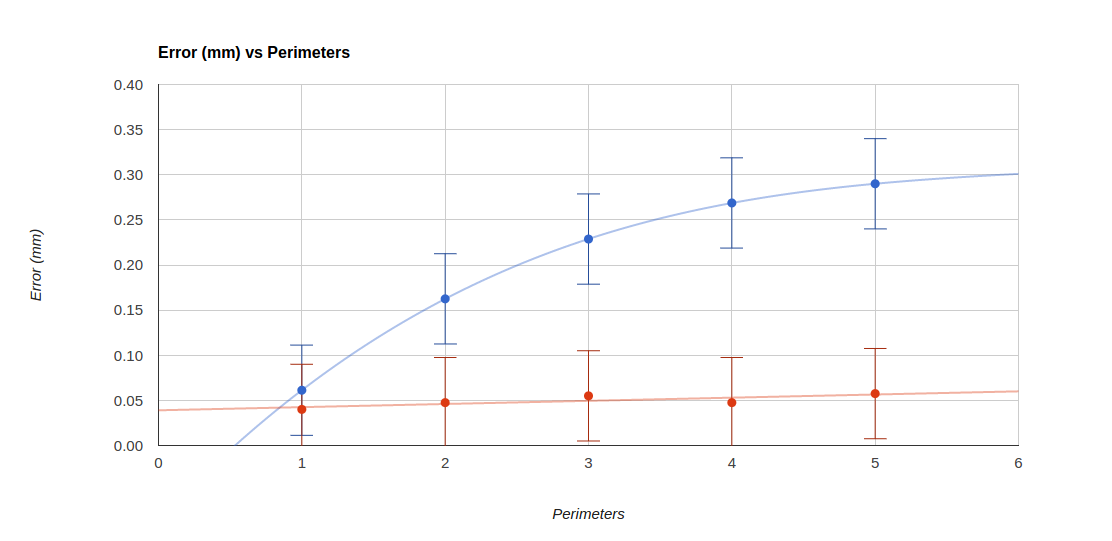
The red line shows the results from a second test piece in which the “Print outer perimeters first” setting was used.

So in summary I don’t think I’ve learned anything new here. Outer perimeters first seems to be the solution as has been suggested before. I was quite surprised to find that the error to perimeters relationship is not linear, but this might be due to errors in measurement, since there is a straight line that goes between all the error bars.

Advertisement

Site Downgrade

I have decided to move the RapCAD website to a new hosting solution. There are two reasons for this, firstly I don’t see the need any more to host two separate blogs, and secondly because the new solution is cheaper. As a result of this change the bug tracker and forums have gone, (they were not being used anyway) and git hosting has moved primarily to github.

Offset advantage

I implemented an offset module in RapCAD a while ago. I developed it primarily for calculating print outlines, since the outline must be smaller than the required shape by half the width of the printed filament. The module can also be very useful in other applications such as creating a hollowed out shape. Usually we can create a hollowed out shape simply by performing a difference operation. However when the shape is complex it can be tricky to create a smaller shape of the correct proportion to subtract. In the above image the top 2D shape is created using the offset module, whereas the bottom shape is created using a naive translate and scale technique. Where the scale module simply shrinks the shape uniformly in all directions, the offset module shrinks the shape to the correct proportions offsetting the outline of the shape by the same amount at every point.


Version 0.9.0 is available this month. See the Download Page for details.

Powers of 2

Breaking with tradition I have decided to do a release on the 16th this month instead of the 8th. Then the following release I plan to do on the 32nd, which of course doesn’t exist so it will actually be the 1st of month. The reason for this is just for fun, and because I would like to have my releases go out on the first day of the month 😉

Changes

  • Implemented amf export feature. – Thanks to Steve Kelly for his work on this
  • Allow range values to be treated as though they are vector values.
  • Implemented preferences for edge and vertex size.
  • Added simple about box dialog that displays the RapCAD version number.
  • Improved the tool tips in main window tool bar.
  • Improve memory management for values.
  • Improvements to array concatenation code and some tests.
  • Fixed some defeferenced null pointer exceptions in polygon.
  • Documentation Improvements.
  • Added some more examples
  • Licensing updated.

Version 0.8.0 is available this month. See the Download Page for details.

New Release

A few things have been added to RapCAD in the last 6 months so I decided to make a new release. Hopefully now that the release scripts are working on the build server I will be able to make releases more frequently, assuming that enough gets added to the code base to warrant a new release. I’d like to make releases once a month again as I think that was just about right.

Changes

  • Implemented add assign (+=), and subtract assign (-=) operators.
  • Added some simple examples.
  • Implemented center() module for centering about the bounding box.
  • Fix for cylinder and cube of zero height.
  • Updated icons.
  • Added support for non centered spheres
  • Implemented new functions tanh() sinh() cosh() atan() atan2() acos() asin() exp() pow() ceil() floor() round() min() max() sign() abs() sin() cos() tan().
  • Added warning when function cannot be found.

Version 0.7.0 is available this month. See the Download Page for details.

New Interest

I haven’t been able to work on RapCAD for a few months as I have been busy with other activities. I have however been contacted by a few people who are still interested in the project. I have even had one person willing to help out with the coding, so I would like to take the opportunity to welcome Steve Kelly aboard the dev team.

Build Server

RapCAD builds are becoming a bit tedious so I am trying to streamline the process by setting up a build server that hopefully will automagically build for Windows, Mac, and Linux. Because of this, I have not done much development on RapCAD this month just a few bug fixes.

The build server is a small mini-itx based rackmount server that stays on permanently and runs a few other daemons and cron jobs. It has quite a nice hard disk layout with the main readonly partition being on a flash drive and the /home on a large RAID array. /tmp and swap are on partitions of the disks that do not form part of the array. The server runs some VirtualBox VMs that do the build processes for the various platforms.


Version 0.6.0 is available this month. See the Download Page for details.

RapCAD printer interface

I have been starting to think about how to integrate the controls for my Reprap Mendel into RapCAD. I was inspired by Kliments pronterface console which as well as being colorful also looks very intuitive and clutter free. So far all I have done is added a simple prototype GUI interface which can be accessed via the print button from the RapCAD main toolbar. This will allow basic integration and testing with the libreprap library.

Ideally of course I also need to finish off the remaining electronics on my Reprap Mendel so that the integration can be tested properly. So in many ways I want the features that I am developing now to motivate me to finish of my Mendel, which after an initial bout of progress has been sitting on the shelf and collecting dust for a year. The reason it has been so long is that I got distracted writing RapCAD. For some reason I thought that I would have enough time to spend on both projects, but as always I am going to have to manage my spare time more carefully.


Version 0.5.0 is available this month. See the Download Page for details.

RapCAD dynamic arrays.

Just a short post this month. I just wanted to give an example of dynamic arrays which are available in RapCAD version 0.4.0. The screenshot shows what I came up with. Not very exciting, but hoping that this will help William Adams to realise some ideas that he has had regarding this. The thing that makes dynamic arrays work is the concatenation operator ~ and the append operator ~=. The operators were influenced by thier counterparts in the d programming language. On another note I have been talking again with Marius who has been looking at the RapCAD back-end code, he seems quite interested in collaborating on a shared back-end library. At this stage he is working to get his visitor branch into OpenSCAD master. When this is done and stable we would like to put some of RapCAD’s features such as this one into OpenSCAD.


Version 0.4.0 is available this month and supports Dynamic Arrays. See the Download Page for details.

RapCAD imports

The syntax for importing modules into rapcad is quite different from the legacy way of doing it. I decided to break compatibility because of a number of problems with the old syntax, that arise when you want to quickly scan for dependencies. Lets first consider a valid example using the old syntax.

module foo(){
  module bar(){
    import_stl(str("file","name",".stl"));
  }
  bar();
}
foo();

The first problem with this is that the filename argument is actually an expression. If you were parsing this script to find its dependencies, the parser would have to be able to partially evaluate the script, turning str("file","name",".stl") into the string literal filename.stl. The second problem is that the import statements are nested in several sub constructs, meaning that the parser has to understand these constructs in order to extract the import module statements. Last of all the legacy way of importing seems to be inconsistent with the way ‘use‘ and ‘include‘ statements work.

My solution was to add an import statement which works as follows

import <triceratops.off> as dino;

dino();

The import statement appears at the top of the file and it doesn’t take an expression, only a string literal. It cannot be nested, and it fits with the use and include statements. The statement is followed by an ‘as‘ clause and the identifier following the ‘as‘ clause provides a name which can be used to instantiate the imported module. The module can be instantiated any number of times, just as you would any other built-in or user defined module. The module instances can of course be nested in any other construct as required, but the import declaration remains at the top of the file, and so one can easily glean which files the script depends on.


Version 0.3.0 is available this month and is capable of importing OFF files. See the Download Page for details.