No Lathe – Hybrid Thermal Insulator

Shortly after announcing his initial design Adrian updated his Extruder Nozzle Design. The top-hat and steel plate had been combined into a PEEK block instead. I had a few thoughts about the implications of this improvement. The first thing I realised was that getting the required materials would be expensive. Adrian suggests a crowd sourcing solution to this which is a good idea in theory, but I figured that the design could be made cheaper if we went back round PEEK bar. Also after showing my design to a few people on the reprap IRC channel one argued that my Best compromise nozzle offers no real advantage over existing hybrid thermal barriers. I decided to sketch out a few alternative approaches.

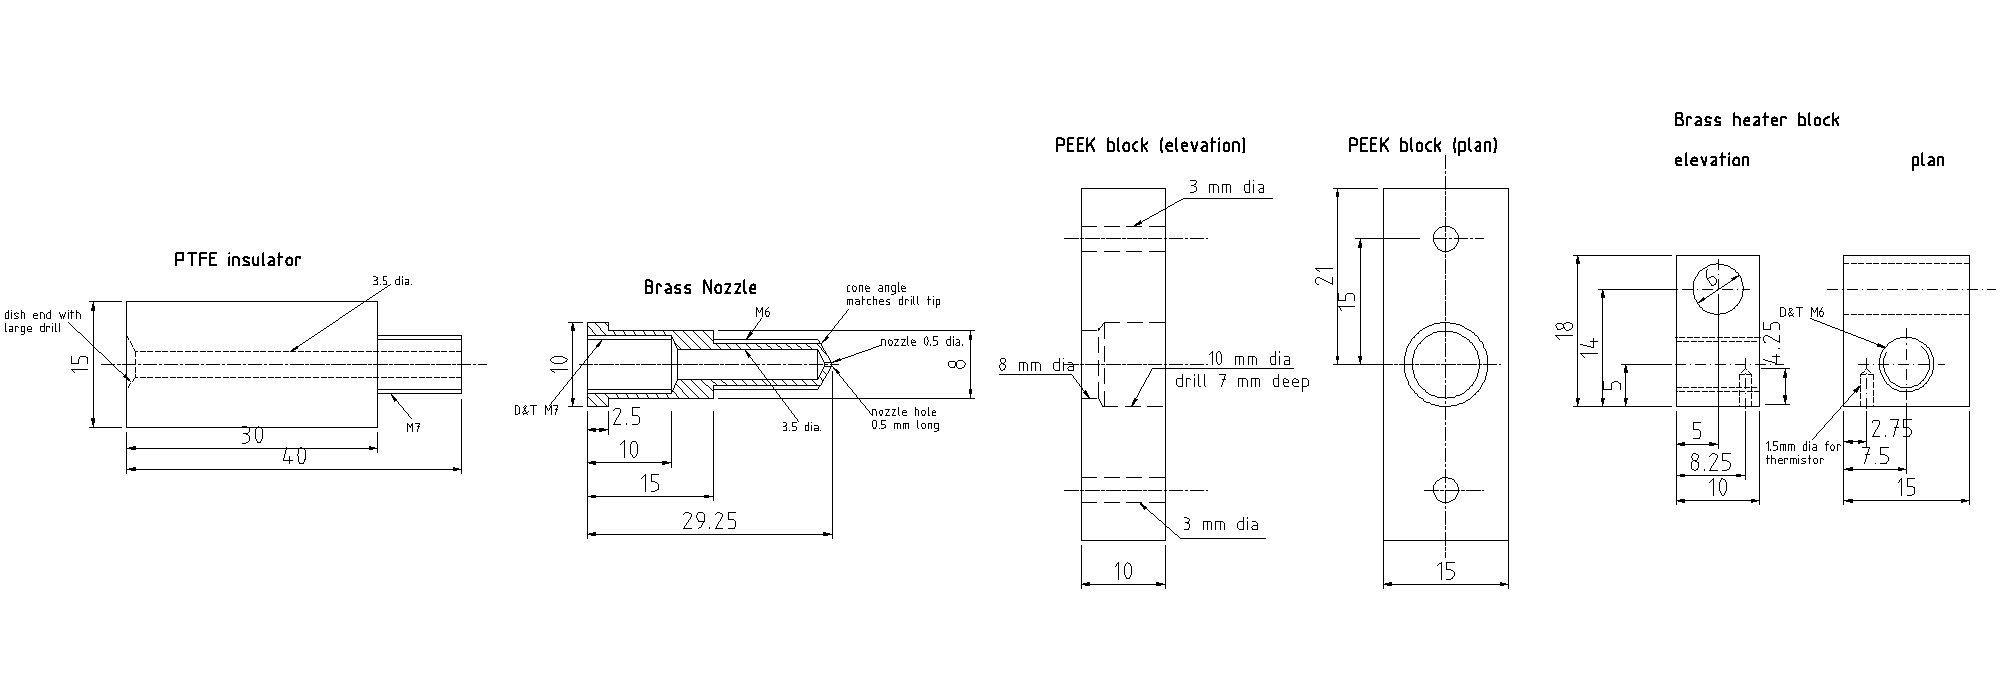
Eventually I came up with something that you are probably all quite familiar with. Its a PEEK insulator with a PTFE insert, however I came up with a slight twist on existing designs. Instead of having an insert that slides into place, my insert is M10 threaded PTFE rod, which screws into an M10 internal thread in 16mm dia PEEK. The brass barrel screws into the PEEK only, and since PEEK is much tougher than PTFE there is little chance of the barrel coming out. The PTFE basically just acts as a nice slippery surface for the filament.

I came up with a drilling methodology that I think keeps things as concentric and true as possible when using a drill stand. The first step is to drill a 16mm hole into a piece of wood, which acts as a work piece clamp. The PEEK was a tight fit in the piece of wood, since it was slightly over 16mm, I tapped into place with a hammer. Next I drilled a blind 8.5mm dia hole to a depth of 25mm. I found it was better not to drill a pilot hole as then the piece would turn in the holding jig. I tapped the hole to M10 using a taper tap followed by a plug tap, as I wanted to get the thread as close as possible to the bottom. I had already prepared a length of M10 threaded PTFE which I cut longer than needed so that I could screw it in and use the protruding part to screw it in extra tight. I cut the PTFE flush and drilled a 3.5mm hole all the way through the assembled insulator. This 3.5mm hole then acted as a centre so that when I turned the PEEK over I could drill the 5.0mm and Tap to M6.

Here is the result, I was quite pleased how central the hole turned out, before I bought a drill stand I had had a lot of difficulty getting a hole to be consentric over this length.

Advertisement

Best compromise extruder nozzle

I haven’t posted for a while. Firstly because I took a three week holiday in Brazil and secondly because I have been very busy. Anyway before I left I had been looking at simpler way of making Adrian’s new extruder nozzle. Adrian’s design requires that you tap an M7 internal thread inside an 8mm brass bar, not only does M7 seem to be an non-standard size it also seems that you need quite good tolerances to get that right. Of course you also have the problem of getting an 0.5mm orifice in the end of the brass nozzle, and I had already decided that its near impossible to do this in any DIY setup. What I came up with initially was this design:

Instead of a one piece nozzle like Adrian’s design this design uses nozzles and barrels that can be readily bought from places like Makerbots, ReprapSource, and RepRapStores. I asked my Dad to turn the other parts on his lathe which he kindly did for me while I was on holiday.

And here is a photo of the assembled nozzle, the retaining plate is not shown in this photo.

Unfortunately when my Dad made the PTFE insulator he mis-interpreted my drawing and tapped an M6 thread down the centre instead of a 3.5mm hole. When I got back from Holiday, my Dad was on his Holiday for three weeks, and so impatience prompted me to try to re-make it without using a lathe. What I did was buy some 10mm dia PTFE and put an external M10 thread on it

Then I drilled and tapped an internal M10 thread into a short piece of 16mm PTFE. I used a drill stand to do this, and I had to support the PTFE in a block of wood with an 16mm hole drilled into it. I screwed the 10mm PTFE into the 16mm PTFE and got my desired shape ready for drillng the 3.5mm hole down the centre.

This technique could be used as a simple method for making the same part in Adrian’s extruder nozzle, just use M7 instead. At this point I wondered (as you might be), why not just use the M10 threaded PTFE as the barrel instead of the above. Well I am not entirely sure how to answer that question, because that would of course be simpler, although I can say that the 16mm PTFE does have more structural rigidity than M10.

Update: I have since made some further improvements to this design which are documented here amongst other ideas.

Fluffed it

Due to a series of mistakes and disasters I have already broken my new extruder head

I made a couple more pulleys using PLA, but then decided that the barrel was too short and tried to remove it. Moral of the story, don’t try to remove a nozzle from a barrel after extruding plastic through it.

OverlapStrap Extruder Head 0.2

The first extruder head that my Dad made for me a while back had a number of pitfalls

  • It was difficult to drill a 0.5mm hole (he broke several drill bits trying to make it)
  • The resistor wasn’t a very tight fit in the aluminum block.
  • The thermistor was attached using Thermic Seal which despite being rated to 1250 °C would crumble and fall out.

So my Dad kindly offered to make a new and improved version based on some specifications and designs that we came up with together.

Rather than try to drill a 0.5mm hole I bought an already fabricated nozzle. Quite a few companies make these now specifically for reprap printing machines including Makerbot, ReprapStores, MakerGear and ReprapSource.

My Dad turned down the nozzle to a round insert that could be put directly into the aluminum heater block. The other addition was a PTFE thermistor clamp to hold the thermistor on using two m3 screws rather than glue.

OverlapStrap Y Chassis Rebuild

For some reason my Y Chassis started to stiffen up such that the leadscrew would pull out of the silicone tubing attaching it to the stepper. Although I managed to get it working again with the leadscrew, I figured that this would not be much good when I upgraded to belts. There were a couple of other niggles I had with the design, so I decided to redesign and rebuild the chassis. This time rather than using fixit blocks to act as clamps I decided to go back to the tried and tested aluminum angle design.

Since the build surface is raised above the chassis using PTFE stands, I didn’t need to do nearly any counter-sinking of holes, as before.

All the OverlapStrap drawings have been updated to reflect the changes.

By the way, If anyone is wondering what the big red thing is on the bottom of the bed its a huge 600W, 9″ Silicone heater for my heated bed. I will blog more about it when its finished but here is a sneak peak

Extracting 2D mendel outlines using OpenSCAD

Here is a quick and easy way to get 2D DXF drawings extracted from 3D STL shapes using OpenSCAD. Launch OpenSCAD and enter the following:

projection(cut=false) import_stl("/full/path/to/stl");

Replace “/full/path/to/stl” with the path to your stl file, and hit F6 to compile and render using CGAL.

From the Design pull down menu choose Export as DXF.

The resulting DXF file as viewed in QCad is basic (circles are made from several straight line segments), but its good for making measurements or printing out templates.

You might find that you have to rotate the STL if you want to get a projection from a different side. You can also set cut=true if you want to cut the object using the XY-plane instead of projecting onto the XY-plane, if you do you will need to translate your object by a negative Z value. e.g:

projection(cut=true) translate([0,0,-10]) rotate([0,90,0]) import_stl("file.stl");

See the projection function in the OpenSCAD manual for more details.

projection

Flash Bang Motherboard

I decided to “upgrade” my generation 3 electronics to use a real stepper motor driver instead of the PWM hack non-sense.

For those who don’t already know, the Makerbot electronics are not really designed for Mendel, and specifically the extruder controller is designed to run a gearmotor instead of Mendel’s stepper motor. The Mendel firmware was “hacked” to make the gearmotor controller push 12v through a 2.3v stepper motor but, by making the gearmotor controllers simulate PWM output (which reduces the output power) it doesn’t blow the stepper. From the perspective of re-purposing existing electronics, the idea is a “really neat hack”, and in theory it should just work. Needless to say that in practice, in my experience, the extruder controller makes the stepper run hot, and with a high pitched squeak coming out of it at all times.

Re-wiring the motherboard to use a separate extruder is quite a simple task, just connect the SCL output of the motherboard to the Dir pin of the stepper driver, and the SDA output to the Step pin. However when I came to do this myself I didn’t have and couldn’t find this vital bit of information. So using a multimeter connected to the powered up motherboard I tried to determine which output should be connected to which. Well in the process of probing around I managed to short +5v to GND. I heard a fssssszt noise and saw a flash come from the motherboard….oh no!

Well I think I managed a lucky escape, one of the tracks on the Motherboard had acted as a fuse and blew, so with the bit of repair shown above circled in green, the motherboard was working again.

PLA – For less warp.

Well for some of the bigger parts I have been trying to print, I have tried using Polylactic Acid.

The first part I printed with the PLA, belt-split-jig-universal-20ff.stl, was a great success. But the second copy wasn’t so good. I have no idea why, but perhaps the ambient air temperature of the room was different.

The second copy is on the right in the first image, and on the top in the second image. You can see that a corner lifted quite substantially during the print.

One mans trash, is another mans filament holder.

I recently had someone round to fit a new Aerial to the exterior of my house (previously I had a makeshift Aerial propped up in the loft) Just after he left I noticed that he had left an empty coaxial cable reel next to my dustbin.

Great I thought I shall use it a a filament dispenser. Now all I have to do it attach a spindle so that it can rotate freely. I was lucky to get hold of one for free, I guess the only way someone else could get one is to buy some coaxial cable

Teeth and Wings

I haven’t posted for a while because I have been too busy tinkering and printing things 😉 But I thought I would post an update because I have finally managed to print some usable pulley’s.

I am finding Repsnapper, much easier to use than anything else and I am getting good results because it keeps the gcode simple. Removing the shield and homing gcodes, saves a lot of time and headaches. Thanks to Trish for that who timed my printer while it was returning home, and calculated that I could save about 1hr 30mins on the overall print!